Showing posts with label bacon. Show all posts

Friday, December 27, 2013

Bacon Jam


This is a game-changer, folks. Bacon jam. It becomes this little chant in your head, bacon jam, bacon jam, bacon jam. You'll be trying to come up with excuses to smear it on any and everything you eat. You won't want to share. You'll get a little crazy. Bacon jam, bacon jam, bacon jam!

I had been meaning to make a savory jam recipe for a few months now, and after weeks of procrastinating for homemade holiday gift ideas, I decided bacon jam would be a fun treat to give away. Of course, as soon as I had made the jam I didn't want to give any of it away because it is so dang delicious, but I resisted hoarding this jam all for myself and gave away all but one jar. I know, I'm reallllly selfless like that.

Makes six 8oz. jars
Cooking time: 2-3 hours (simply depending on whether you feel like multitasking)

Ingredients:
  • 1 lb thick-cut bacon
  • 8 garlic bulbs
  • Olive oil for drizzling, about 1 tablespoon
  • 10 yellow onions
  • 1 tablespoon butter
  • 1/2 cup apple cider vinegar
  • 1/3 cup honey
  • 1/2 cup balsamic vinegar
  • 2 teaspoons salt
  • 2 teaspoons cracked black pepper
  • 2 teaspoons chili flakes
Directions:
  1. Preheat oven to 400 F. Peel and slice all yellow onions. Place them in a large Dutch oven or heavy-bottomed pot along with the butter, apple cider vinegar, and honey. Cook for 2 hours over medium-low heat until onions are caramelized and dark brown, stirring occasionally. Add the balsamic vinegar, salt, pepper, and chili flakes. Cook for an additional 45 minutes then place in a large bowl for blending  (or if you have a blender or food processor, place the onion into that!).
  2. While the onions caramelize, slice the top 1/4" off the top of each garlic bulb to expose the cloves. Grease a casserole dish then place all garlic bubs in sliced-side up. Generously drizzle with olive oil, cover with foil and roast for 35-45 minutes until garlic is tender and golden. Let the garlic cool, then use a butter knife to pop out each clove into the same bowl (or blender) where you put the onions (it doesn't matter which order you put things together for blending, so if you want to wait to roast the garlic until the end of the caramelizing time, go for it!)
  3. Preheat a large skillet to medium-high heat. Chop the bacon into 1/2" pieces and cook until crispy. Use a slotted spoon to transfer the bacon onto a paper-towel lined plate to drain. Cover with foil and place in refrigerator until you are ready to blend the jam.
  4. Once all cooking is finished, place the caramelized onions, roasted garlic, and bacon in a large bowl and blend with a hand immersion blender until still slightly chunky (or place directly into a food processor or blender and do the same - you want a chunky jam consistency). 
  5.  Use a funnel (wide-mouthed for canning) to distribute the jam evenly between six 8 ounce jars. Jam will last up to 2 weeks refrigerated. Serve it warmed up with fresh dinner rolls, on pork chops, in a sandwich, with water crackers and brie... or on a spoon? Yeah. That's also a good option. 
I added tags and expiration dates to the jars I gave away, and wrapped them in tissue paper for an easy but festive look. I brought a jar of this jam and a loaf of homemade French bread for Christmas morning, and it was delicious along with scrambled eggs and coffee.


Sunday, October 20, 2013

Bacon and Green Chili Dip

I was first introduced to this dip by my former roommate Chelsey at a Superbowl gathering during university, and it's a dip that disappears quickly because once you have a little taste you're hooked. I asked her for the recipe afterward, and to be honest I was expecting a hoard of secret ingredients and tricks because it was indescribably delicious. Like, you can taste the bacon and green chiles (seeing them also helps), but it's so much more than that. I brought this dip to a party last night and listening to their comments I remembered my exact sentiments the first time I tried it -- What else is in here? Why does it taste so good? Is that a parmesan taste? Are there olives in here? What seasonings were used? Doesn't it kinda taste like baked potato skins?  What's in it?!   And the best part about it? It's so simple and easy it's laughable. Which is fabulous. Be warned, this dip is super rich and decadent and by no means a "healthy option" dish, but if you're looking for a crowd-pleaser this one will surely do the trick. 

Ingredients:
  • 1 lb bacon, thick cut style
  • 2 cans diced green chilies
  • 1 1/2 cups sour cream
  • 1 cup cream cheese, room temperature
  • 2 green onions, thinly sliced
Directions:
  1. Preheat oven to 375 F. 
  2. Chop the bacon into 1/2" pieces (roughly), then cook to your desired crispness (I like it just-crisp in this dip). Drain on a paper towel-lined plate and set aside. 
  3. In a medium bowl mix the green chiles, sour cream, cream cheese, and green onions. Fold in the bacon, then scoop into a casserole dish. Bake for 20 minutes or until bubbly, serve hot with tortilla chips, slices of baguette, and/or fresh veggies (such as carrots, celery, bell peppers).


Variations and other add-ins: minced jalapeño, diced black olives, caramelized onions, roasted garlic.

Note: the original recipe I was given had slightly different amounts (1 can green chilies and 1 cup sour cream), but I found for a crowd of 10+ people the portions above are just right as an appetizer that leaves no leftovers. Also, it was originally served in a hollowed out sourdough loaf, which is also yummy but for the sake of minimal prep for bringing a dish to a party, I leave it in a casserole dish.

If you want to see what else Chelsey is cooking up these days, please visit her blog: Curio of the Culinary World

Monday, June 3, 2013

Prawn and Bacon Fajitas


Prawns and Bacon sitting in a tree, d-e-l-i-c-i-o-u-s.
I know, that didn’t even come close to rhyming, but that’s not what this is about. This is a love story on a plate. In a tortilla. Along with some queso fresco and guacamole (and that guac has a back story of its own, but I’ll tell you all about it another time). And I think there are certain things in this life that are just absolutely perfect when paired together. Cinnamon and chocolate. Shirley Temples and Mexican food. Snow and hot cocoa. Prawns and Bacon. There is something so naughty about combining a juicy prawn and that divine hunk of fatty pork in one bite, and to date this is my favorite dish that does just that. Thus, I give you Prawn and Bacon Fajitas.

Prawn and Bacon Fajitas
Serves 2 (or 4+ for small appies)

Ingredients:
  • 15-20 large raw prawn tails, peeled and deveined
  • 2 cloves garlic
  • ½ tablespoon sriracha
  • 1 teaspoon onion powder
  • 1 teaspoon cumin
  • ½ teaspoon each salt and pepper
  • ¼ small red onion
  • 1 large ripe avocado
  • 2 fresh lemons
  • ½ cup chopped cilantro, divided
  • ½ cup Queso Fresco (or other soft farmer’s cheese)
  • 1 large tomato
  • 2 cups chopped spinach
  • ½ lb bacon (if you can get it as one thick slab, do it. Otherwise, get thick-cut bacon)
  • 8 small tortillas
 

Directions:
1.      Mince the garlic and add it to a medium bowl along with the prawns, sriracha, onion powder, cumin, salt, and pepper, and the juice of one lemon. Stir lightly to coat the prawns evenly, cover with plastic wrap and set in the fridge.
2.      Finely dice the red onion and add it to a small bowl. Add the juice of the remaining lemon and ¼ cup of the chopped cilantro. Slide your knife around the pit of the avocado, gently grab each half and twist to separate. Discard the pit. Scoop the avocado into the bowl with the red onion and mix together (I like to run my knife crisscross through the flesh while it’s still in the peel so it’s easier to mix once it’s been scooped out). Season to taste with salt and pepper and set aside.
3.      Chop the tomato, toss with a splash of olive oil and the cilantro, season with salt, and set aside.
4.      Chop the bacon into roughly ½ chunks am-sized and place in a medium skillet. Place the skillet over medium heat and cook the bacon until just crispy stirring minimally, about 5 minutes. Remove the bacon with a slotted spoon and place on a paper-towel lined plate and set it aside.
5.      Remove the prawns from the fridge and set them next to the stove (I’m all about organization!). Drain the bacon fat off the pan and place the pan back on the heat.  Add the prawns and let them cook for 2-3 minutes each side. Place the prawns in a bowl, add the bacon and toss together.  
6.      Serve hot with queso fresco, spinach, tortillas, and the prepared toppings. Assemble as you wish!

This is also delicious with other sides and toppings, such as:
·         Corn
·         Chopped black olives
·         Rice
·         Salsa
·         Sour cream
·         Beans
·         Chopped green chiles

Tuesday, November 13, 2012

Corn Chowder

The other day the universe kept presenting corn chowder to me: it showed up on Stumbleupon, all over Pinterest, on my recipe generator... So I knew I had to make it (plus after seeing it over and over I had a serious craving to satisfy!).

Here is my version of corn chowder (feel free to play around with quantities and variations- this chowder is perfect for that!)

Ingredients:
  • 2 tablespoons butter
  • 1 yellow onion, chopped
  • 1 cup canned diced green chiles
  • 1 red bell pepper, diced
  • 2 cloves garlic, minced
  • 6 slices thick cut bacon, diced
  • 1/4 cup flour
  • 2 cups chicken stock 
  • 2 cups cream 
  • 2 cups frozen corn
  • 1 1/2 cups shredded cheese (think cheddar, pepperjack)
  • 3 tsp cumin
  • 2 tsp ground black pepper
  • 2 teaspoons salt
  • 1 tsp cayenne powder
 Directions:
  1. Heat a large stock pot to medium heat. Add in the butter, onion, green chiles, bell pepper, and garlic. Cook for about 10 minutes until the onions are translucent, stirring occasionally. 
  2. Add in the bacon, stir to mix it in, then slowly add the flour to the mix, stirring constantly to coat the bacon and veggies. Cook for 5 minutes, stirring often, then gradually add the stock and the milk, alternating 1 cup each at a time. Add in the corn, then bring the chowder to a boil. Add in the cheese, taste the chowder, then season accordingly (listed are the amounts I used).  
  3. Simmer for 20-30 minutes over low heat so that the chowder can thicken. Serve hot with slices of crusty baguette or alongside a salad. 

This chowder saves well and is excellent for weekday lunches!

Variations:
- use 3 large bell peppers instead of the green chiles for a more mild pepper flavor
- add chorizo or Italian sausage instead of bacon
- serve over a bed of rice with salsa, sour cream, and tomatoes
- add in a can of beans and use vegetarian stock instead of using bacon and chicken stock for a hearty vegetarian twist
- add roasted jalapenos and roasted garlic instead of green chiles and raw garlic


Friday, September 7, 2012

Butternut Squash Pasta Bake

I'm always trying to think of creative ways to have pasta because the BF doesn't eat tomatoes. Not stewed, canned, roasted, sun-dried, raw, pureed, nada. Which makes pasta night a little challenging - there are only so many times I can happily serve noodles with butter (his favorite) and white sauce (think cheesy, Alfredo, or mushroom soup) is too rich to have often. I was planning to make a butternut squash soup with sausage and mushrooms, but we ended up eating the sausage the night before so I came up with a casserole that was scrumptious and I even have enough leftovers to cover my next few days of packed lunches. It has a lot of little steps but it is well worth the effort!


Serves: 4-6

Ingredients:
  • 2 medium butternut squashes
  • 4 tablespoons butter, separated
  • 10-12 white mushrooms (about 1/2 lb)
  • 4 cloves garlic
  • 6 slices thick cut bacon
  • 1 container ricotta cheese (250g)
  • 2 large eggs
  • Salt, pepper, dried oregano to taste
  • 8 cups cooked pasta (like shells, spirals, rigatoni-think sauce holders!)
  • 2 cups shredded mozzarella
Directions:
  1. Preheat the oven to 350 F. Slice the squashes lengthwise and crosswise to have 8 sections of squash total. Pour 1 cup water in a 9x13" glass baking dish, then place the squash flesh side down in the dish (it's ok if it doesn't all fit perfectly, just do the best you can). Cover with foil and bake for 30 minutes. Remove from oven, flip the squash flesh-side up and dab them with 2 tablespoons butter. Season with salt and pepper, cover the dish again and bake for an additional 30 minutes. 
  2. Meanwhile, remove the stems and peel the mushrooms (or instead of peeling, clean with a moist paper towel). Preheat a large saute pan to medium heat. Add the mushrooms and butter, and cook for 15 minutes, stirring occasionally. Add the garlic and turn the heat to low, cook for 10 minutes. Place the mushroom mixture in a large bowl and set aside.
  3. Remove the squash from the oven and let it cool until it can be handled. Use a spoon to scoop the flesh into the mushroom bowl, discard the peel. 
  4. Re-heat the saute pan to medium-high heat. Chop the bacon into 1/2 thick slices and add it to the pan, cook until crisp (5-7 minutes). Use a slotted spoon to scoop the bacon into the squash and mushroom mixture, stir to combine everything. 
  5. In a small bowl add the ricotta and eggs, beat with a fork for 2-3 minutes, season with salt, pepper, and oregano.
  6. Rinse and re-use the dish that you baked the squash in. Grease the pan then add the pasta in an even layer. Scoop spoonfuls of the ricotta over the pasta, gently smoothing it to make it an even layer. Next scoop and smooth the squash mixture across the ricotta. Top with mozzarella.
  7. Bake at 350 F for 30 minutes, or until top is golden and bubbly. Serve hot! (I topped mine with a drizzle of sriracha for an extra kick, while the BF kept his pure).

Tuesday, October 25, 2011

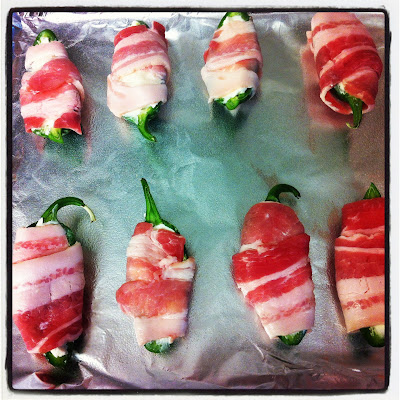
Cream Cheese Jalapenos Wrapped in Bacon

One of my favorite blogs for kitchen inspiration is the Pioneer Woman Cooks. She always has the most delicious recipes (not to mention mouth-watering photos!), and I'm never disappointed when I re-create them in my own kitchen. When I came across her blog a couple years ago, the first recipe that drew me in was her "Bacon-wrapped Jalapeno Thingies"... oh. my. lord. They are addictive and delicious, and I give them credit for one of the many reasons why my BF loves me. I'm only half-joking. I passed the recipe on to my BF's mother, and now the rest of his family is hooked as well.


I have tried variations of this recipe, like adding shredded cheese to the cream cheese, adding salt/pepper, adding sausage to the stuffing, changing the time and heat... While they were all yummy variations, they never came close to the unadulterated version. PW had it right (oh so right) the first time, so I'm just going to give you a link to her blog and recipe so you can go straight to the source of all things delicious!

Here is the link to the cream cheese stuffed jalapenos wrapped in bacon. 

I only have a few words of caution: Her website induces hunger, even if you just ate a feast. You will make these jalapenos more than once, no matter how hard you try to resist. These babies can be verrry spicy, so have some beer (or milk) on hand to tame them.


Wednesday, June 15, 2011

Boston Baked Beans

When I graduated from university at the end of April, my family came from Colorado to visit. They loaded me up with cans of green chile, Mexican seasonings, enchilada sauce and beans. I love Mexican food, and let's just say Canada does not know how to do Mexican cuisine so it is always a pleasure when I get a care package from la familia filled with food, especially Mexican food!

Well, then my mom handed me a bag of Great Northern Beans and a card from my aunt and uncle in Arizona. At first I didn't understand the connection, but upon reading the card I found two recipes: one for classic Boston Baked Beans and one for my Grandma's Bean Soup! So exciting because I associate baked beans with growing up and visiting my grandparents' house. My sister and I often spent weekends and portions of summers there, playing hide-and-seek in the house, eating mulberries in the yard, and searching for hidden boxes of Russel Stover's chocolates. I have a large family, and summer "get-togethers" were quite frequent. All family barbeques (or so my memory tells me) included some variation of potato salad and a pot of baked beans, so I require both dishes throughout the summer to keep myself normal.

Thanks to my lovely aunt, I now have a recipe for baked beans that I can rely on!

Ingredients:
  • 1 lb. cooked great northern beans
  • 1/2 cup molasses
  • 1/4 lb bacon, cubed
  • 1 teaspoon salt
  • 1 tablespoon mustard (hot or mild)
  • pinch of pepper
Directions:
  1. Mix all ingredients and pour into a casserole dish. Add enough hot water to cover the beans. Bake covered at 350 f for 3 hours, stirring occasionally. 
  2. Uncover and cook til it has achieved the desired consistency.
Enjoy!
PS - Keep an eye out for grandma's bean soup!

Tuesday, June 14, 2011

Creamy Pasta with Bacon, Asparagus, and Mushrooms

One thing you are pretty much guaranteed to find in my fridge at all times of the year is a bundle of asparagus. Asparagus sneaks its way into pretty much everything I make, from pizza to spring rolls, sandwiches to quesadillas, pasta to salads.... I love it. And luckily, so does the BF so I don't get any complaints about having asparagus for the hundredth time this month.

I don't usually buy bacon, but this week it was on sale and all of a sudden I was salivating. I had to have bacon in my life right away.

I had just a few mushrooms, a few stalks of asparagus, and a couple slices of bacon left in my fridge which suddenly added up to be my decadent dinner the other night. This pasta is quick and easy, super-rich and yummy... pretty much the best pasta I've had in a while.


Ingredients:
  •  4 mushrooms
  • 3 stalks of asparagus
  • 2 slices of bacon
  • 1 cup pasta (shells or rotini)
  • Alfredo sauce (I cheated an used a jar, but you can make it from scratch!)
Directions:
  1. Heat a medium skillet over medium heat. Slice the mushrooms, cute the asparagus stalks into quarters, and chop the bacon into small pieces. Add to the skillet and cook until the bacon is crisp. 
  2. Meanwhile, cook the pasta in a medium pan and drain it. Put the pasta back into the pan for later. Prepare a plate lined with paper towels or napkins for the bacon mix.
  3. Once the bacon is fully cooked, use a slotted spoon to transfer the bacon and veggies to drain on the prepared plate. Add the desired amount of alfredo sauce to the pasta, and turn onto low heat. Add the bacon mixture, stir until the pasta is heated through. Serve warm!

Enjoy!