Tuesday, October 25, 2011

Potato and Sausage Soup

Fall vegetables are great bases for hearty soups that can provide a week's worth of meals. This soup is particularly low-budget friendly and delicious. The ingredients are simple and basic staples which makes this a very low-maintenance meal. The flavors blend with time, so it's a great soup to make at the end of the weekend for easy dinners throughout the week.

Serves 2 hearty eaters, plus leftovers for 6 more modest bowls

Ingredients:
  • 4 potatoes
  • 1/2 cup cream (room temperature)
  • 2 cups milk (room temperature)
  • 1/2 small yellow onion
  • 8 oz. ground pork 
  • Dried thyme/rosemary, pepper, cayenne, salt
  • Splash of hot sauce
Directions:
  1. Preheat the oven to 450 F. Light coat each potato in olive oil, pierce with a fork a couple times each, then wrap individually in foil. Bake for 60 minutes. 
  2. Meanwhile, heat a medium skillet to medium-high heat and add in the ground pork. Dice the onion and add to the skillet, stirring occasionally to ensure even browning. You want this pork to get nice and crispy so it's texture will stand up to the soup. Season the pork with thyme, rosemary, coriander, pepper/salt, and a pinch of cayenne.
  3. Once the potatoes are done, unwrap each potato and slice in half lengthwise. Using a large spoon, scoop out the potato into a large pot. Add the cream, milk, and hot sauce. For a smooth soup, use an immersion blender to puree the potato. Otherwise, you can use a whisk to break up the potato into the soup. Turn the heat to medium-low and stir in the cooked pork and cook until the soup thickens and is heated through, about 25-30 minutes. 
  4. Serve hot!
Enjoy!

This soup is a meal in itself, but if you need some greens add chopped fresh spinach  to your bowl before ladling in the soup. 
Slow-Cooker Chicken Noodle Soup

A great way to get the most out of your ingredients is to keep leftovers in mind. I love roasting chickens because I know I can use some of the meat that night, whether it's the drumsticks or the breasts, and the leftovers can be used the rest of the week in a variety of dishes. I use the meat in sandwiches, burritos, pastas, salads... the list is endless! Once I'm getting tired of chicken (usually around day 3 because I use it in my breakfast burritos, my lunches, and my dinners!), I make soup with the remaining meat. The bones from the chicken are also great for making soup, as they lend amazing flavor and nutrients. Chicken noodle is a simple soup that can use up any leftover chicken and veggies in your refrigerator, and it's a filling and relatively low-calorie meal to boot!

Ingredients:
  • 1 chicken carcass (I like to keep everything, but you can also just use the bones from drumsticks, wings, etc. if you don't want to bother storing the whole cavity until it's soup-making time)
  • Left over chicken, cut up into small chunks
  • 5carrots
  • 8 stalks of celery
  • 1 large yellow onion
  • 1 bay leaf
  • Dried seasonings: oregano, cumin, thyme, rosemary, pepper/salt
  • 3 cups boiled noodles, al dente
Directions:
  1. Chop 2 carrots and 3 stalks of celery into 3" long pieces, the cut the onion in half. Store the remaining vegetables.
  2. Turn the slow-cooker to high, add in the chicken bones, the bay leaf, and the prepared vegetables. Pour in 8 cups of water and cook for 8 hours (tip: do this before bed and cook until morning). 
  3. Strain the broth over a large bowl, discarding the cooked vegetables. Dice the reserved carrots, celery, and onion and add them to the slow cooker. Add 6 cups of broth back to the slow cooker along with the pieces of chicken. Add seasonings to taste (go lightly and season again at the end of cooking), then cook the soup for 8-10 hours on low. 1 hour before serving, add the cooked noodles. 
Enjoy!

You can also make this soup in a stock pot, cooking low and slow. I just prefer my crockpot because I can set it and forget it!

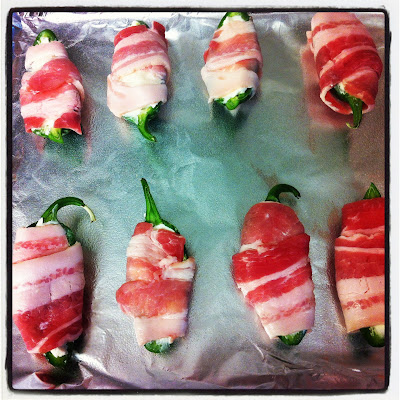
Cream Cheese Jalapenos Wrapped in Bacon

One of my favorite blogs for kitchen inspiration is the Pioneer Woman Cooks. She always has the most delicious recipes (not to mention mouth-watering photos!), and I'm never disappointed when I re-create them in my own kitchen. When I came across her blog a couple years ago, the first recipe that drew me in was her "Bacon-wrapped Jalapeno Thingies"... oh. my. lord. They are addictive and delicious, and I give them credit for one of the many reasons why my BF loves me. I'm only half-joking. I passed the recipe on to my BF's mother, and now the rest of his family is hooked as well.


I have tried variations of this recipe, like adding shredded cheese to the cream cheese, adding salt/pepper, adding sausage to the stuffing, changing the time and heat... While they were all yummy variations, they never came close to the unadulterated version. PW had it right (oh so right) the first time, so I'm just going to give you a link to her blog and recipe so you can go straight to the source of all things delicious!

Here is the link to the cream cheese stuffed jalapenos wrapped in bacon. 

I only have a few words of caution: Her website induces hunger, even if you just ate a feast. You will make these jalapenos more than once, no matter how hard you try to resist. These babies can be verrry spicy, so have some beer (or milk) on hand to tame them.


Baked Zucchini Sticks

I have a deep love for football season  and the reason is game time snacks. Loaded nachos, wings, dip, stuffed mushrooms... anything I can eat with my hands is fine by me! The downside to game snacks is that they are usually high-cal and delicious, which means that I'll eat about a week's worth of calories during one quarter. Yikes! So, over the past year I've fiddled with my favorite snacks to cut down the guilt without sacrificing flavor, and these zucchini sticks are a favorite (even my BF loves these, and he's a die hard fan of all things not healthy!).

Ingredients:
  • 3 large zucchini
  • 1/4 cup olive oil
  • 2 cups panko
  • Desired seasonings - salt/pepper/cumin/garlic powder/cayenne/thyme/paprika
Directions:
  1. Preheat the oven to 425 F. Line two baking sheets with foil and set aside. 
  2. Slice the zucchini into 3 x 1/2" sticks and set aside. Mix the panko and the seasonings in a medium bowl, then pour the oil into a bowl for dipping. Set up an assembly line to keep things easy and clean! 
  3. Dip one stick at a time first in the oil to coat, then into the panko. Make sure the panko is coating all sides of the stick, then place the stick on a prepared baking sheet. Repeat with the remaining sticks. Bake in the top third of the oven for 20-25 minutes, flipping the sticks once halfway through. An easy rule to remember is the sticks are done when the panko is golden!
  4. Use a spatula to transfer the zucchini sticks to a paper towel-lined plate, then let sit for a minute or two before serving. 
Enjoy!

Psssst! This recipe doesn't contain eggs, so it's a great recipe for when you have vegan/vegetarian guests!

Suggested dips for the sticks:
  • marinara sauce
  • ranch dressing
  • tzaziki
  • Thai peanut sauce
  • salsa
  • mustard


Wednesday, October 19, 2011

Roasted Squash

Roasted squash is a great side dish for pretty much anything, in my mind. It is great served with roasted chicken, inside a burrito, swirled into your favorite hearty stew, mixed with pasta shells and parmesan, or served alone with a dab of butter and a dash of salt and pepper! It's creaminess lends a richness to any meal without added tons of calories. I prefer to bake it in the rind and scoop out the contents because it creates a much juicier and smoother product than roasted slices.
The key to a juicy roasted squash that you scoop from the rind is simple: water.


Medium Sized Squash (acorn, butternut, spaghetti, etc.) : Serves 4

Ingredients:
  •  1 whole squash (try to find one that is blemish free!)
  • Water
Directions:
  1. Preheat the oven to 400 F. Pour 1 cup of water to a large casserole dish.
  2. Using a large knife, slice the squash in half lengthwise and place face down in the casserole dish. 
  3. Add enough water to cover 1/2" of the squash (2-4 cups depending on the size of the casserole and squash). 
  4. Bake for 1 hour or until fork-tender (think potato!) and remove the squash halves carefully from the pan and let sit for 15 minutes on a cutting board.
  5. Scoop out and discard the pulp and seeds with a spoon, then scoop the squash into a medium sized bowl. 
Here is where you can use your artistic and culinary license to make this squash your own! 
In case you're not in the mood for creativity and just want a recipe, dang it, here are some add-in suggestions:
  • 1 tablespoon butter, 1 dash pico de gallo
  • 1 tablespoon butter, 1 teaspoon brown sugar, dash of salt and ground nutmeg
  • Chopped fresh rosemary, thyme, and salt/pepper to taste
  • A few dashes of hot sauce, cumin, salt/pepper
  • Marinara sauce (I sometimes cook spaghetti squash and treat it like it's namesake, it's delicious!)
  • Toasted pine nuts
  • Chopped, cooked bacon


Friday, October 14, 2011

Easy Breakfast Burritos

I love a light breakfast that is light enough to keep me from falling back asleep, but hearty enough to keep my tummy quiet until lunchtime. These breakfast burritos are perfect because I use the small flour tortillas to limit the portion size, but they're packed with potatoes, eggs, and jalapeños to kick-start the day! They also take 20 minutes start to finish with time in between to blow-dry your hair or get dressed, so these are perfect for an on-the-go morning, too!

Serves 2

Ingredients:
  • 2 small flour tortillas
  • 2 eggs
  • 2 baby gold potatoes
  • 6 slices of pickled jalapeño
  • Salt/Pepper/spices to taste


Directions:
  1. Slice the potatoes into thin rounds, about 1/8" thick. Add 2 cups of water to a deep, medium-sized skillet and turn to medium-high heat. Add the potatoes and a dash of salt. Let them simmer until tender, about 7 minutes. 
  2. Drain the water, add a splash of oil or a small amount of butter to the pan to give the potatoes some color, then after about two minutes turn the heat to medium. 
  3. Dice the pickled jalapeño, add it to the potatoes in the pan. Crack the eggs into the pan, add salt, pepper, and any spices you want (I like cumin, cayenee, oregano, and garlic powder). Mix  everything together, stir constantly until the eggs are cooked, (about 2 minutes from cracking time). 
  4. Pile half of the mixture onto the center of a tortilla. Fold the tortilla into a burrito (I like to fold the bottom up a bit then roll it to the left so it's sealed at the bottom and open at the top, perfect for eating by hand as I walk out the door!), and repeat with the second tortilla for burrito #2!
Enjoy!